|
NOTE Outlook for Android requires a device running Android 4.0 or later.
By using the Outlook for Android you can access your email, calendar, contacts, and OneDrive files from within the app rather than having to check separate apps.
NOTE You cannot access tasks from the Outlook for Android app.
-
-
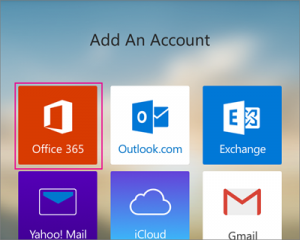
- Download the Outlook for Android app from the Google Play store if you haven’t installed it yet.
If you already have it installed, open it and then depending on your device, tap the navigation control at the bottom of your Android, or tap More > Settings > Add Account.
- Tap Office 365 if you have a work or school account in Office 365 for business.
-
-
- Enter your full email address, for example first initial last name@rvu.edu, type your password, and then tap Sign in.
NOTE If you previously selected Exchange to set up your account you may receive a message about security upgrades and you need to re-sign in. Follow the prompts and sign in with your full email address and password.
Outlook for Android then starts syncing the account.
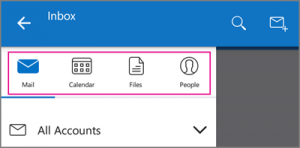
- To view your calendar, files, or contacts from the app, tap More

-
-
- To learn more about using Outlook for Android, tap the navigation control at the bottom of your device, or tap Menu > Help. Or, see Frequently asked questions about Outlook for iOS and Android.
Delete an account
-
-
- Depending on your device, tap the navigation control at the bottom of your device, or tap More > Settings.
- Tap the account you want to delete.
- Select Remove Account from Device and Remote.
|
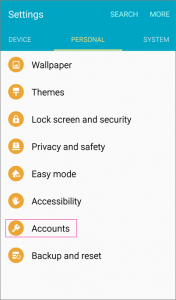
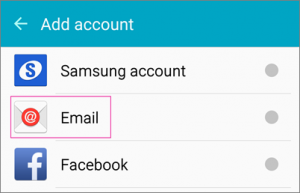
Tap Settings > Accounts > Add account > Email.
-
-
- Type your full email address, for example firstname.lastname@rvu.edu, type your password, and then tap Next.
- Select the Exchange option.
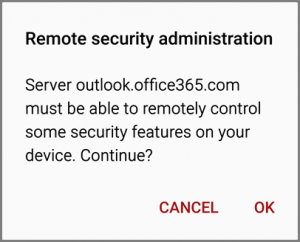
- Depending how the Office 365 administrator in your organization set up your account, you might receive a message about additional security features. Select OK to continue.
 
-
-
- Once the device verifies the server settings, the Account Options page opens. Accept the defaults or select the options for how you want to receive and send your mail, and then tap Next. (You may need to scroll down to see Next.)
- On the Set up email page you can change the name of your account. When you’re finished tap Done.
If you synced your calendar and contacts in step 5 you can go to those apps on your phone to view any items that might be there. If you synced tasks as well, you should see them in the calendar app on your device. It might take a few minutes for everything to sync.
If your device can’t connect make sure you typed your email address and password correctly and try again. If you still can’t connect try setting it up manually following the steps below.
Manual set up
-
-
- Tap Settings > Accounts > Add account > Email.
-
-
- Type your full email address, for example firstname.lastname@rvu.edu, type your password, and then tap Next.
- Select Manual.
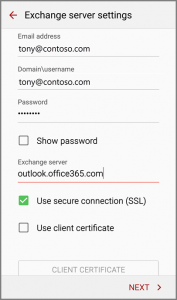
- Review the settings on the Exchange server settings page and update if necessary.
-
- Email Make sure your full email address is in this box, for example, tony@contoso.com.
- Domain\Username Type your full email address in this box, for example, tony@contoso.com. If Domain and User names are separate text boxes in your version of Android, leave the Domain box empty, and type your full email address in the Username box.
- Password Use the password that you use to access your account.
- Exchange Server The server name for Office 365 for business is outlook.office365.com.
- Make sure the Use secure connections (SSL) box is checked.
-
-
- Tap Done.
- Depending how the Office 365 administrator in your organization set up your account, you might receive a message about additional security features. Select OK or Activate to continue.
-
-
- Accept the defaults or make changes for how you want your account to sync on your device. When you’re finished, swipe to the bottom and tap Next.
- On the Set up email page you can change the name of your account. When you’re finished tap Done.
If you synced your calendar and contacts in step 7 you can go to those apps on your phone to view any items that might be there. If you synced tasks as well, you should see them in the calendar app on your device. It might take a few minutes for everything to sync.
|